
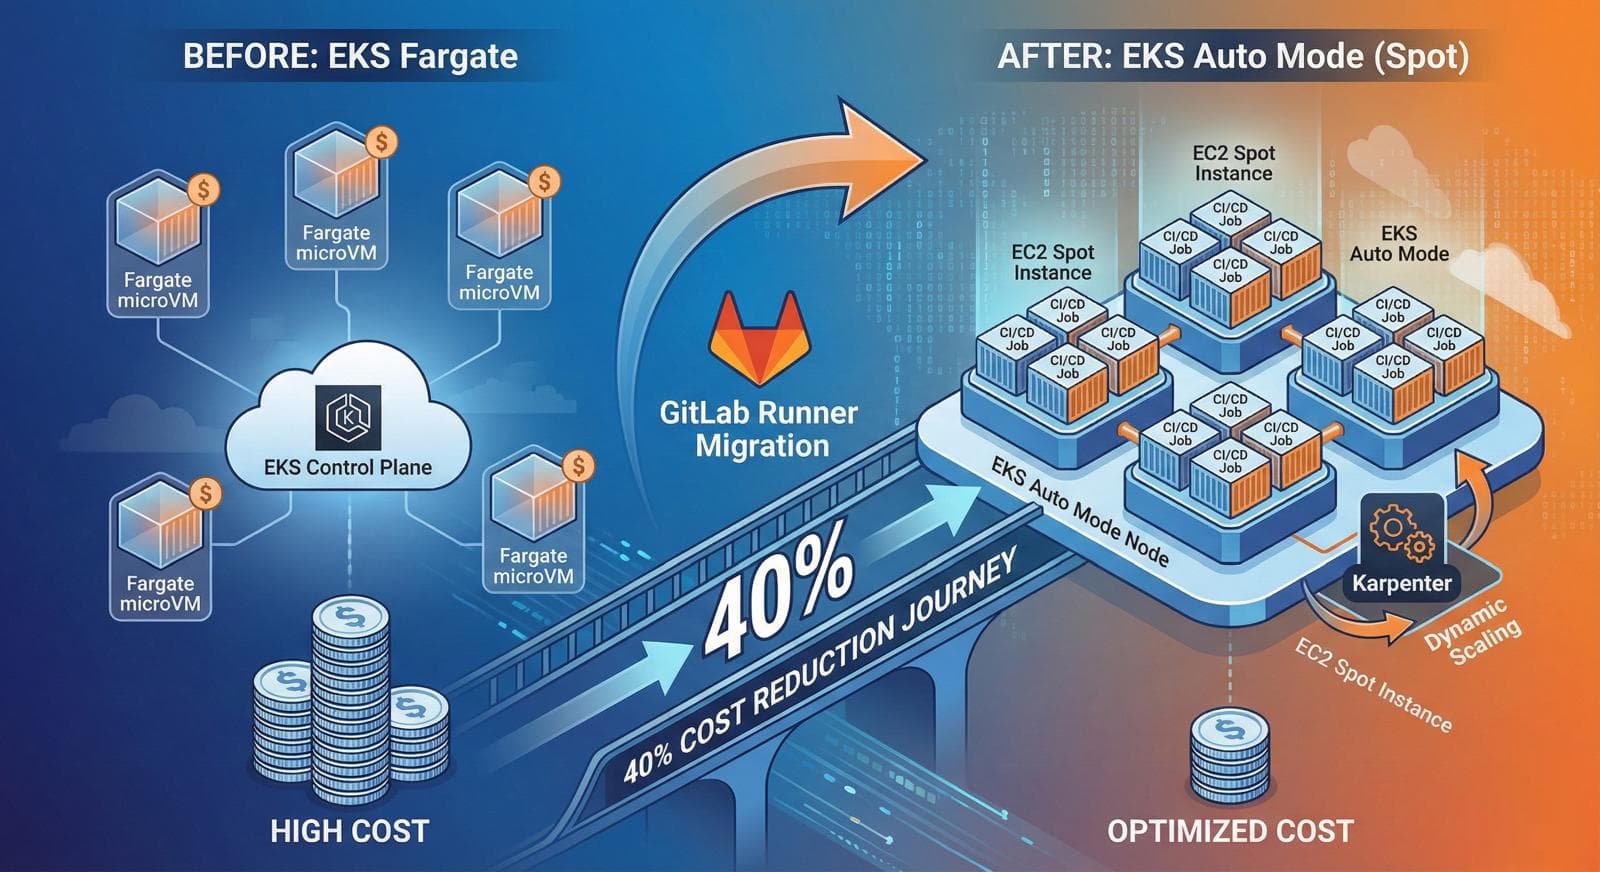
Migrating GitLab Runners from EKS Fargate to EKS Auto Mode: A 40% Cost Reduction Journey
How we reduced our CI/CD infrastructure costs by switching to EKS Auto Mode with Spot instances, and why Infrastructure as Code was essential for production reliability

The Problem: Fargate Costs Were Adding Up
For over a year, we ran our GitLab Runners on Amazon EKS with AWS Fargate. The serverless approach was appealing—no nodes to manage, automatic scaling, and a simple mental model. Each CI/CD job spun up as a Fargate pod, ran its tests, and disappeared.
But as our engineering team grew and pipeline frequency increased, the monthly bill told a different story:
| Component | Monthly Cost |
|---|---|
| Fargate vCPU hours | ~$115 |
| Fargate memory hours | ~$28 |
| EKS control plane | ~$74 |
| NAT Gateway | ~$77 |
| Supporting infrastructure | ~$90 |
| Total | ~$385/month |
The Fargate compute alone was costing us $143/month for what amounted to intermittent CI/CD workloads. Our pipelines ran maybe 4-6 hours of actual compute per day, yet we were paying premium serverless pricing for every second.
Why Fargate Becomes Expensive for CI/CD
Fargate pricing in eu-west-1:
$0.04048 per vCPU per hour
$0.004445 per GB memory per hour
For a typical CI job requesting 2 vCPU and 4GB memory running for 15 minutes:
Fargate cost: ~$0.034 per job
Equivalent spot instance (m6a.large): ~$0.007 per job
That's nearly 5x more expensive than spot instances for the same workload.
Why Run GitLab Runners on Kubernetes (EKS)?
Before diving into our solution, it's worth understanding why we chose Kubernetes in the first place. There are several ways to run GitLab Runners on AWS:
Option 1: EC2 Instances (Docker/Shell Executor)
The traditional approach—run GitLab Runner directly on EC2 instances using the Docker or Shell executor.
Pros:
Simple to set up and understand
Full control over the environment
Works with existing EC2 knowledge
Cons:
Manual scaling: You manage autoscaling groups, launch templates, lifecycle hooks
Resource waste: Instances run 24/7 or you build complex scaling logic
Docker-in-Docker issues: Security concerns with privileged containers
Maintenance burden: OS patching, Docker updates, runner upgrades are your responsibility
No bin-packing: Each instance typically runs one job at a time (or complex queue management)
Option 2: ECS with Fargate or EC2
Amazon ECS offers container orchestration without Kubernetes complexity.
Pros:
Native AWS integration
Fargate provides serverless containers
Simpler than Kubernetes for basic use cases
Cons:
No native GitLab integration: GitLab Runner doesn't have an ECS executor—you'd need custom solutions
Task definition management: More complex than Kubernetes pods for dynamic workloads
Limited ecosystem: Fewer community tools and patterns compared to Kubernetes
Vendor lock-in: ECS is AWS-specific; Kubernetes skills transfer across clouds
Option 3: EKS with Kubernetes Executor (Our Choice)
GitLab Runner's Kubernetes executor is purpose-built for CI/CD on Kubernetes.
Pros:
Native GitLab integration: First-class support in GitLab Runner
Automatic pod lifecycle: Each job gets a fresh pod, automatic cleanup
Bin-packing: Multiple jobs share nodes efficiently
Karpenter/Auto Mode: Intelligent, automatic node provisioning in seconds
Ecosystem benefits: Helm charts, operators, monitoring tools
Portability: Same configuration works on any Kubernetes cluster
Security: Pod security standards, network policies, IRSA for AWS access
Cons:
Kubernetes complexity: Learning curve if you're new to K8s
More moving parts: Nodes, pods, services vs. just EC2 instances
Why EKS Won for Us
The deciding factors were:
GitLab's Kubernetes executor is mature: Handles job isolation, artifact management, and service containers natively
Karpenter changes everything: No more managing autoscaling groups—Karpenter provisions exactly what you need in seconds
Cost efficiency through bin-packing: Multiple CI jobs share a single node, maximizing utilization
Team skills: We already run production workloads on Kubernetes
Future flexibility: Easy to migrate to another cloud or on-premises if needed
Why EKS Auto Mode with Spot Over Standard EKS with Fargate?
This is the key architectural decision. Both approaches run on EKS, but they have fundamentally different characteristics.
EKS with Fargate: The Serverless Promise
Fargate abstracts away nodes entirely. You define pod specs, and AWS handles the compute.
How Fargate works for GitLab Runners:
Job triggered → GitLab Runner creates pod → Fargate provisions microVM → Job runs → Pod terminates
Fargate Advantages:
Zero node management
Per-second billing
Strong isolation (each pod is a separate microVM)
No capacity planning
Automatic security patching
Fargate Disadvantages for CI/CD:
Premium pricing: 20-40% more expensive than on-demand EC2, 5x more than Spot
No Spot support: Can't use Spot instances with Fargate (as of 2024)
Cold starts: Every job spins up a new microVM (30-60 seconds)
No node reuse: Can't cache Docker layers, npm packages, or Maven artifacts on disk
Resource limits: 4 vCPU / 30GB memory maximum per pod
No DaemonSets: Can't run node-level agents (though less relevant for CI/CD)
EKS Auto Mode with Spot: Managed Karpenter
Auto Mode gives you the operational simplicity of Fargate with the flexibility and cost of EC2.
How Auto Mode works for GitLab Runners:
Job triggered → GitLab Runner creates pod → Karpenter provisions Spot node (if needed) → Job runs on shared node → Pod terminates → Node consolidates when empty
Auto Mode Advantages:
Spot pricing: 60-70% cheaper than on-demand, 80%+ cheaper than Fargate
Intelligent provisioning: Karpenter selects optimal instance types in seconds
Node reuse: Multiple jobs share warm nodes—no cold starts
Diverse instance pools: Specify many instance types for Spot availability
Managed Karpenter: AWS handles installation, upgrades, and security patches
Consolidation: Automatically terminates unused nodes
Auto Mode Considerations:
Spot interruptions: 2-minute warning when instances are reclaimed (mitigated by diverse instance types)
Some node awareness needed: You configure NodePools, though it's simpler than managing node groups
Shared security model: Multiple pods share a node (use Pod Security Standards)
Cost Comparison: Real Numbers
For our workload (~100 CI jobs/day, average 15 minutes each):
| Approach | Monthly Compute Cost | Explanation |
|---|---|---|
| Fargate | ~$143 | Premium per-second billing, every job is a new microVM |
| On-Demand EC2 | ~$85 | Better bin-packing, but still paying full price |
| Spot EC2 | ~$45 | 60-70% discount, excellent bin-packing with Karpenter |
| Reserved | ~$55 | Requires commitment, doesn't scale to zero |
Spot on Auto Mode delivered 68% compute savings compared to Fargate.
When to Choose Each
Choose Fargate when:
Security requires microVM isolation per job
Workloads are unpredictable or very low volume
Team lacks Kubernetes experience
Simplicity is worth the cost premium
Choose Auto Mode with Spot when:
Cost optimization is a priority
You run enough jobs to benefit from node reuse
You can tolerate occasional Spot interruptions (GitLab retries automatically)
Team is comfortable with basic Kubernetes concepts
The Solution: EKS Auto Mode with Spot Instances
In late 2024, AWS announced EKS Auto Mode—a fully managed experience that handles node provisioning, scaling, and lifecycle management automatically. Unlike traditional EKS where you manage node groups or install Karpenter yourself, Auto Mode includes:
Built-in Karpenter: AWS manages the Karpenter installation and upgrades
Managed node classes: Pre-configured, secure node templates
Automatic scaling: Nodes spin up in seconds when pods are pending
Spot instance support: Native integration with EC2 Spot for massive cost savings
This was exactly what we needed—the operational simplicity approaching Fargate with the cost efficiency of EC2 Spot.
Why CDK Instead of CLI Commands?
AWS published an excellent blog post titled "Streamline your containerized CI/CD with GitLab Runners and Amazon EKS Auto Mode" that walks through setting up GitLab Runners on Auto Mode using CLI commands. It's a great tutorial for getting started.
However, for production infrastructure, we chose AWS CDK (Infrastructure as Code) instead. Here's why:
1. Reproducibility
# CLI approach - hope you documented everything
eksctl create cluster --name gitlab-runners --version 1.34 ...
kubectl apply -f nodepool.yaml
helm install gitlab-runner ...
vs.
// CDK approach - the code IS the documentation
const cluster = new eks.Cluster(this, 'GitLabRunners', {
  version: eks.KubernetesVersion.V1_34,
  defaultCapacityType: eks.DefaultCapacityType.AUTOMODE,
  // Every configuration decision is captured here
});
With CDK, our entire cluster configuration is version-controlled. Six months from now, when someone asks "why did we configure Karpenter consolidation this way?", the answer is in the Git history.
2. Multi-Environment Consistency
We run separate clusters for development, staging, and production CI/CD. CDK lets us define the infrastructure once and deploy it consistently:
// Same stack, different environments
new GitLabRunnersStack(app, 'Dev', { env: 'development' });
new GitLabRunnersStack(app, 'Prod', { env: 'production' });
With CLI commands, you're copying and pasting between environments, inevitably introducing drift.
3. Dependency Management
Our GitLab Runner stack depends on:
An existing VPC with specific subnets
IAM roles with IRSA (IAM Roles for Service Accounts)
S3 buckets for build cache
Secrets Manager for runner tokens
CDK handles these dependencies elegantly:
const cacheBucket = new s3.Bucket(this, 'RunnerCache', {
  lifecycleRules: [{ expiration: cdk.Duration.days(30) }],
});

const runnerRole = new iam.Role(this, 'RunnerRole', {
  assumedBy: new iam.FederatedPrincipal(
    cluster.openIdConnectProvider.openIdConnectProviderArn,
    // IRSA trust policy automatically configured
  ),
});

runnerRole.addToPolicy(new iam.PolicyStatement({
  actions: ['s3:GetObject', 's3:PutObject'],
  resources: [cacheBucket.arnForObjects('*')],
}));
4. Safer Updates
When we needed to change the Karpenter NodePool configuration (more on that later), CDK gave us:
cdk diffto preview changes before applyingCloudFormation rollback if something went wrong
A clear audit trail of what changed and when
5. Integration with Existing Infrastructure
Our CDK codebase already manages VPCs, databases, and other AWS resources. Adding the GitLab Runners stack meant it automatically inherited:
Consistent tagging policies
Security group rules
Monitoring and alerting configuration
Cost allocation tags
The Implementation
Cluster Configuration
const cluster = new eks.Cluster(this, 'GitLabRunnersCluster', {
  clusterName: `gitlab-runners-${environment}`,
  version: eks.KubernetesVersion.V1_34,
  kubectlLayer: new KubectlV34Layer(this, 'KubectlLayer'),

  // This is the magic - Auto Mode handles everything
  defaultCapacityType: eks.DefaultCapacityType.AUTOMODE,

  // Use existing VPC
  vpc: ec2.Vpc.fromLookup(this, 'Vpc', { vpcId: config.vpcId }),
  vpcSubnets: [{ subnetType: ec2.SubnetType.PRIVATE_WITH_EGRESS }],

  // Enable cluster logging for debugging
  clusterLogging: [
    eks.ClusterLoggingTypes.API,
    eks.ClusterLoggingTypes.AUDIT,
    eks.ClusterLoggingTypes.SCHEDULER,
  ],
});
NodePool for Spot Instances
The key to cost savings is the Karpenter NodePool configuration:
const spotNodePool = new eks.KubernetesManifest(this, 'SpotNodePool', {
  cluster,
  manifest: [{
    apiVersion: 'karpenter.sh/v1',
    kind: 'NodePool',
    metadata: { name: 'gitlab-spot' },
    spec: {
      template: {
        metadata: {
          labels: { 'node-type': 'spot' }
        },
        spec: {
          nodeClassRef: {
            group: 'eks.amazonaws.com',
            kind: 'NodeClass',
            name: 'default'  // Use Auto Mode's managed node class
          },
          requirements: [
            {
              key: 'node.kubernetes.io/instance-type',
              operator: 'In',
              values: [
                // Diverse instance types for spot availability
                'm6a.large', 'm6a.xlarge',
                'm7a.large', 'm7a.xlarge',
                'c6a.large', 'c6a.xlarge',
                'c7a.large', 'c7a.xlarge',
              ]
            },
            {
              key: 'karpenter.sh/capacity-type',
              operator: 'In',
              values: ['spot']  // Spot instances only
            },
          ],
        }
      },
      disruption: {
        consolidationPolicy: 'WhenEmpty',
        consolidateAfter: '5m',
        budgets: [{ nodes: '100%' }]  // Allow consolidation of empty nodes
      }
    }
  }]
});
GitLab Runner Helm Chart
const gitlabRunner = cluster.addHelmChart('GitLabRunner', {
  chart: 'gitlab-runner',
  repository: 'https://charts.gitlab.io',
  namespace: 'gitlab',
  values: {
    gitlabUrl: 'https://gitlab.com',
    runnerToken: runnerToken.secretValue.unsafeUnwrap(),
    concurrent: 20,
    runners: {
      config: `
        [[runners]]
          executor = "kubernetes"
          [runners.kubernetes]
            namespace = "gitlab"
            cpu_request = "2"
            memory_request = "4Gi"
            [runners.kubernetes.node_selector]
              node-type = "spot"
            [runners.kubernetes.pod_annotations]
              karpenter.sh/do-not-disrupt = "true"
      `
    }
  }
});
The Results
After migrating and decommissioning the old Fargate cluster:
| Metric | Before (Fargate) | After (Auto Mode) | Change |
|---|---|---|---|
| Monthly compute | $143 | ~$45 | -68% |
| Total monthly | $385 | ~$230 | -40% |
| Annual savings | - | ~$1,860 | - |
The dramatic compute savings come from:
Spot pricing: 60-70% cheaper than on-demand, and 80%+ cheaper than Fargate
Efficient bin-packing: Multiple CI jobs share the same node
Right-sized instances: Karpenter picks the optimal instance type for pending pods
Lessons Learned (The Hard Way)
Lesson 1: Understanding Karpenter Disruption Budgets
Our first deployment used settings designed to prevent job disruption:
disruption:
  consolidationPolicy: WhenEmpty
  consolidateAfter: 5m
  budgets:
    - nodes: '0'  # WRONG - this blocks ALL consolidation!
We thought nodes: '0' meant "don't evict nodes with running pods." What it actually means is "you can disrupt ZERO nodes at any time"—which completely blocks consolidation, even for empty nodes.
The symptom: After CI jobs completed, nodes with only DaemonSet pods (CloudWatch agent, GuardDuty agent) would never terminate. We ended up with 14 orphaned nodes running indefinitely, burning money.
The fix: Use nodes: '100%' to allow Karpenter to consolidate empty nodes:
disruption:
  consolidationPolicy: WhenEmpty      # Only consolidate when NO workload pods
  consolidateAfter: 5m                # Wait 5 minutes after becoming empty
  budgets:
    - nodes: '100%'                   # Allow consolidation of all empty nodes
How job protection actually works:
WhenEmptypolicy: Karpenter ignores DaemonSet pods when determining if a node is "empty"—a node with only CloudWatch/GuardDuty agents IS considered emptydo-not-disruptannotation: Pods with this annotation prevent their node from being consolidatedCombined effect: Running CI jobs are protected by the annotation, but nodes scale down within 5 minutes of jobs completing
Lesson 2: Add the do-not-disrupt Annotation
For explicit job protection, annotate your job pods:
[runners.kubernetes.pod_annotations]
  karpenter.sh/do-not-disrupt = "true"
This tells Karpenter: "Never consolidate a node while this pod is running." When the CI job completes and the pod terminates, the annotation goes with it, and the node becomes eligible for consolidation.
Lesson 3: Avoid Burstable Instances for CI/CD Job Pods
We initially included t3/t3a instances in our NodePool for CI job pods. Bad idea.
CI/CD workloads (especially Maven/Gradle builds) are CPU-intensive and will exhaust the burst credits quickly. Once credits are gone, you're throttled to 20% baseline CPU, and your 10-minute build becomes a 50-minute build.
Use m-series or c-series instances that provide consistent CPU performance for job pods:
requirements:
  - key: 'node.kubernetes.io/instance-type'
    operator: In
    values:
      # Good: Fixed-performance instances for CI job pods
      - 'm6a.large', 'm6a.xlarge'
      - 'c6a.large', 'c6a.xlarge'
      # Bad: Burstable instances for CI jobs (avoid these)
      # - 't3.large', 't3a.xlarge'  # DON'T USE for job pods
Note: This advice applies to the Spot NodePool where CI jobs run. We do use a
t3a.mediumfor the GitLab Runner manager itself—the lightweight, always-on process that coordinates jobs. The runner manager barely uses any CPU (it's just polling GitLab for jobs and creating pods), so it stays well within its burst credits. In fact, we downsized the runner manager from ac7a.mediumto at3a.mediumduring the migration, saving an additional ~$40/month on that single instance alone. The key distinction: burstable is fine for control plane workloads, not for compute-heavy CI jobs.
Lesson 4: Node Labels Must Match Job Selectors
The Auto Mode NodePool must include labels that match your job pod's nodeSelector:
# NodePool template
metadata:
  labels:
    node-type: spot  # Must match...

# GitLab Runner config
[runners.kubernetes.node_selector]
  node-type = "spot"  # ...this selector
If these don't match, Karpenter won't provision nodes for your jobs—pods will stay pending forever.
Lesson 5: Diverse Instance Types for Spot Availability
Don't just specify one or two instance types. Spot capacity varies by instance type and availability zone. More options = higher chance of getting capacity:
values:
  - 'm6a.large', 'm6a.xlarge', 'm6a.2xlarge'
  - 'm7a.large', 'm7a.xlarge', 'm7a.2xlarge'
  - 'c6a.large', 'c6a.xlarge', 'c6a.2xlarge'
  - 'c7a.large', 'c7a.xlarge', 'c7a.2xlarge'
Karpenter will automatically select from available capacity at the best price.
Drawbacks and Considerations
No solution is perfect. Here are the trade-offs:
1. Spot Interruptions
Spot instances can be reclaimed with 2 minutes notice. For CI/CD:
Mitigated by: Diverse instance types (Karpenter will find alternatives)
Mitigated by: Most CI jobs are under 30 minutes
Mitigated by: GitLab automatically retries failed jobs
Reality: We've seen <5% interruption rate in eu-west-1
2. Cold Start Latency
New nodes take 45-90 seconds to provision vs. 30-60 seconds for Fargate pods. In practice, this is negligible because:
Karpenter keeps nodes running for
consolidateAfterdurationSubsequent jobs reuse warm nodes
Only the first job after idle periods sees the delay
3. Increased Complexity
Auto Mode is simpler than self-managed Karpenter, but still more complex than Fargate:
You need to understand NodePools and disruption settings
Debugging requires node-level visibility occasionally
More configuration knobs to tune
4. Cost Visibility
With Fargate, costs are per-pod and easy to attribute. With shared nodes, cost allocation becomes fuzzier. AWS Cost Explorer shows EC2 costs, but not which CI jobs caused them.
5. Shared Node Security
Multiple CI jobs share the same node. If you run untrusted code:
Use Pod Security Standards (restricted profile)
Consider separate NodePools for different trust levels
Or stick with Fargate for strict isolation
When to Stick with Fargate
Despite our migration, Fargate is still the right choice for:
Low-volume CI/CD: If you run <10 pipelines/day, Fargate's simplicity wins
Strict isolation requirements: Each Fargate pod is a separate microVM
Unpredictable workloads: Fargate scales to zero perfectly
Teams without Kubernetes expertise: Fargate abstracts more complexity
Running untrusted code: MicroVM isolation is stronger than pod isolation
Conclusion
Migrating from EKS Fargate to EKS Auto Mode with Spot instances reduced our CI/CD infrastructure costs by 40%. The key enablers were:
EKS Auto Mode: Managed Karpenter without the operational burden
Spot instances: 70% cheaper than on-demand, 80%+ cheaper than Fargate
CDK Infrastructure as Code: Reproducible, version-controlled, and safe to update
The migration wasn't without challenges—understanding Karpenter's disruption budgets took some debugging. But with the right configuration, we now have a cost-effective, reliable CI/CD infrastructure that scales automatically.
Key takeaways:
Use
WhenEmptywithbudgets: [{ nodes: '100%' }]for proper consolidationAdd
do-not-disruptannotations to protect running jobsAvoid burstable instances (t3/t3a) for CPU-intensive CI workloads
Specify diverse instance types for Spot availability
If your Fargate bill is growing and you're comfortable with Kubernetes, EKS Auto Mode is worth serious consideration. The 40% savings we achieved compound quickly, and the operational overhead is minimal thanks to AWS managing the hard parts.
Have questions about this migration? Found a better approach? I'd love to hear from you.